How to Use the Long List Selector for Windows Phone Mango
One of the cool new controls in the Silverlight Toolkit for Windows Phon...
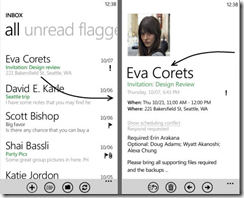
 You know that cool swooshing transition you get when you click an email on your Windows Phone? Now you too can make use of that awesome transition using only the Silverlight Toolkit and this handy dandy Continuum Transition class.
As always, I suggest you use Nuget to include it, but feel free to download it from Codeplex
The actual continuum transition class is pretty big for a blog post, so I’ll show you how to use it first and then you can copy the Continuum Transition class after that.
If you are already using the Silverlight Toolkit transitions using code, then this should hopefully be familar:
private void ListBox_SelectionChanged(object sender, System.Windows.Controls.SelectionChangedEventArgs e)
{
    var selectedElement = (sender as ListBox).ItemContainerGenerator.ContainerFromIndex(lstSeeding.SelectedIndex) as FrameworkElement;

    var navOutTransition = new NavigationOutTransition();
    navOutTransition.Forward = new ContinuumTransition(ContinuumTransitionMode.ContinuumForwardOutStoryboard, selectedElement);

    var navInTransition = new NavigationInTransition();
    navInTransition.Backward = new ContinuumTransition(ContinuumTransitionMode.ContinuumBackwardInStoryboard, selectedElement);

    PhoneApplicationPage phoneApplicationPage =
    (PhoneApplicationPage)(((PhoneApplicationFrame)Application.Current.RootVisual)).Content;

    TransitionService.SetNavigationOutTransition(phoneApplicationPage, navOutTransition);
    TransitionService.SetNavigationInTransition(phoneApplicationPage, navInTransition);

    NavigationService.Navigate(new Uri("/DetailPage.xaml", UriKind.Relative));
}
I’ve used a listbox’s selection changed event as an example, as this is the most common scenario. To break it down, firstly we get the selected item’s framework element. This is the containing element that we are going to animate, in this case a list item.
Next, we setup the actual transitions using the awesome continuum transition class. The first parameter is the type of transition you are making and the second is the element you wish to animate.
After this, we obtain our phone application page and assign the transitions to the transition service.
Once we have done that we can navigate as per normal and the page will automatically transition for you!
The code in full is below. It is hosted on Github so you can be confident the below code is up to date.
Also please note the actual storyboards have come from the awesome guys at Clarity Consulting. There is an especially useful post about transitions you should go read right now.
Welcome to the bottom of the post, please spread the word about this transition to better the Windows Phone platform for everyone :)
Send me a message and I'll get back to you.
