Using the MVC-Mini-Profiler with Entity Framework
[]
[ServiceBehavior(InstanceContextMode = InstanceContextMode.PerCall)]
public class Notifications
{
}
Now that we have a clean project add the following method to your Notifications class:
[WebInvoke(UriTemplate = "register?deviceid={deviceid}&uri={uri}",
    ResponseFormat = WebMessageFormat.Json,
    Method = "GET")]
public string Register(string deviceid, string uri)
{
    // TODO: Save DeviceID and URI here
}
For those of you who are not used to WCF REST services, the above method is essentially just a web method. It is decorated with a WebInvoke Attribute which contains the following parameters:
We’ve done enough now, that if you were to publish your service, the device would think everything was working. Now it’s time to actually save the data.
Now we are going to create the database to store the device information in. Most of you, like me, might be lazy when it comes to DB work, so here is a diagram and script (SQL Server) to create the table for storing devices.
Go ahead and create a new database called WP7AppDB and add the table below.
/****** Object:  Table [dbo].[Devices]    Script Date: 01/18/2011 23:21:39 ******/
SET ANSI_NULLS ON
GO

SET QUOTED_IDENTIFIER ON
GO

CREATE TABLE [dbo].[Devices](
    [DeviceID] [nvarchar](200) NOT NULL,
    [URI] [nvarchar](400) NOT NULL,
    [PushNotifications] [bit] NOT NULL,
    [Added] [datetime] NOT NULL,
    [Modified] [datetime] NOT NULL,
    [LiveTile] [bit] NOT NULL,
    [LiveTileFrequency] [int] NOT NULL,
    [LiveTileLastUpdate] [datetime] NULL,
 CONSTRAINT [PK_Devices_1] PRIMARY KEY CLUSTERED
(
    [DeviceID] ASC
)WITH (PAD_INDEX  = OFF, STATISTICS_NORECOMPUTE  = OFF, IGNORE_DUP_KEY = OFF, ALLOW_ROW_LOCKS  = ON, ALLOW_PAGE_LOCKS  = ON) ON [PRIMARY]
) ON [PRIMARY]

GO

ALTER TABLE [dbo].[Devices] ADD  CONSTRAINT [DF_Devices_PushNotifications]  DEFAULT ((0)) FOR [PushNotifications]
GO

ALTER TABLE [dbo].[Devices] ADD  CONSTRAINT [DF_Devices_Added]  DEFAULT (getdate()) FOR [Added]
GO

ALTER TABLE [dbo].[Devices] ADD  CONSTRAINT [DF_Devices_Modified]  DEFAULT (getdate()) FOR [Modified]
GO

ALTER TABLE [dbo].[Devices] ADD  CONSTRAINT [DF_Devices_LiveTile]  DEFAULT ((0)) FOR [LiveTile]
GO

ALTER TABLE [dbo].[Devices] ADD  CONSTRAINT [DF_Devices_LiveTileFrequency]  DEFAULT ((15)) FOR [LiveTileFrequency]
GO
 There are a million ways to connect to a database, so I’m going to run through my favourite way: Entity Framework.
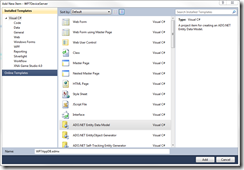
Start by right clicking your project in Visual Studio and selecting Add > New Item…
Next select the ADO.NET Entity Data Model and change the name to WP7AppDB.edmx. I like to use the Database name as the model name. Click OK.
The Entity Data Model Wizard should appear so follow these steps:
You should now have WP7AppDB.edmx at the bottom of your project.
Now that everything is setup, we can finally save the device information. Copy this code into the Register method we created before, replacing the TODO comment we left:
Device device = null;

using (var context = new WP7AppDBEntities())
{
    if (!String.IsNullOrWhiteSpace(deviceid))
    {
        // First try to find an existing device
        device = (from d in context.Devices
                  where d.DeviceID == deviceid
                  select d).FirstOrDefault();

        if (device != null)
        {
            // Do we need to update the URI?
            if (device.URI != uri)
                device.URI = uri;
        }
        else
        {
            device = new Device()
            {
                DeviceID = deviceid,
                URI = uri,
                Added = DateTime.Now,
                Modified = DateTime.Now
            };

            context.Devices.AddObject(device);
        }

        context.SaveChanges();
    }
}

return deviceid;
If you are not familiar with Entity Framework or LINQ, let me explain from the top.
The code in the using statement produces our connection to the database and places it into the context variable. After checking that we were actually given a value, we then use LINQ to see if we can find an existing device in the database.
If we do find a device, we check the existing URI against the one just given to us by the device and if they’re different, we update the database.
If we don’t find a device, we create a new instance of the Device class, which was generated by entity framework, fill in the details and add the new device to the database.
The SaveChanges method actually commits the changes we just made to the database, nothing would happen without it.
We then return the device id passed to us just as a reference. You might like to pass something more meaningful back, but I consider this just a fire and forget method.
You’re done. Go ahead and hit Ctrl+F5 and hit the register method with some dummy data. I did this: http://localhost:9542/notifications/register?deviceid=123&uri=456 (replace the port number with whatever your visual studio created)
If you completed the steps in the previous post to this one, you can even try running your WP7 application and seeing if it connects with some actual data.
Stay tuned for the next exciting episode, where we look at actually pushing notifications to the phone
Send me a message and I'll get back to you.
