

After presenting my project containing Identity Server at a few conferences, I’ve been asked quite a few times to share the code. Unfortunately, the code in question is my real-world startup’s code and I can’t give it away. I am however, happy to share with you all how I structured the application and how it is appropriate for starting a new solution with Identity Server.
First let’s take a look at the Solution Explorer and a quick architecture diagram.
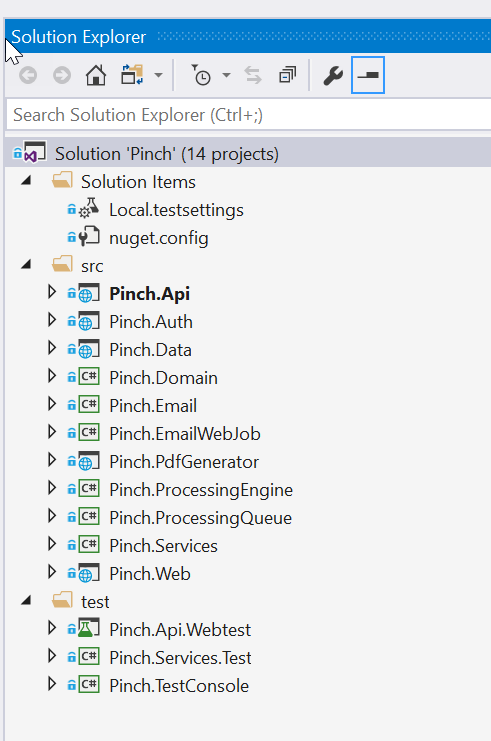
Figure: All projects within the solution
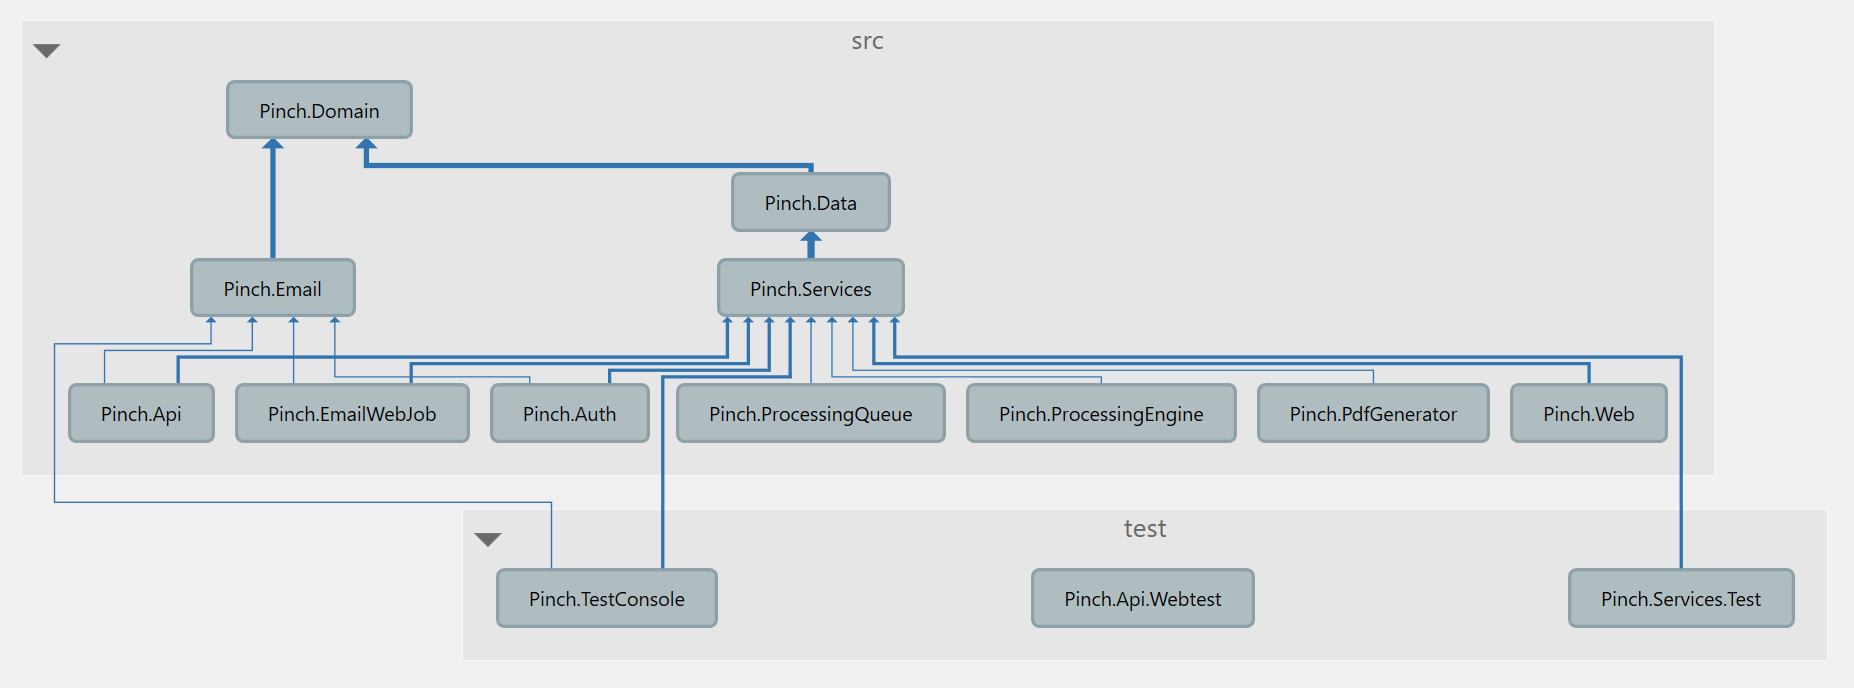 Figure: The architecture diagram, showing the dependency flow
If you’re unfamiliar with Architecture Diagrams, the gist is that they show how the code flows. What classes rely on other classes. How does the solution fit together. Typically, you want the flow to only ever go in one direction, with no backwards dependencies. This means that your solution is architected well, and is decoupled enough that you can swap out any piece without too much trouble.
My solution is architected using the Onion Architecture. To better understand my description below it might be a good idea to read up on that link and other resources before continuing.
Another interesting fact is that my solution is also a Monolith: A single solution containing absolutely everything. Some of you may have heard bad things about Monolithic Architecture and have been told to break down your application into pieces/services. This idea is the driving force behind Service Oriented Architecture, and more recently the popularly known Microservices. Don’t get me wrong, I quite like these forms of architecture as well, and actively try to keep my solution in a state whereby I could split out certain pieces into their own service if I needed to scale them independently. The major reason I go with Monoliths, especially to start with, is because they are simple, self-contained, and reduce complexity. I highly recommend starting with an Onion Architecture if you’re newer to software development, progressing to multiple domains (using Domain-Driven Design) eventually once you understand how to best split up your applications, using a SOA or Microservices design.
All this aside, let’s dig into the individual projects and their purposes.
NOTE: At the time of writing I’m on .NET Core 1.1 and Identity Server 4 (v 1.x). I’ll update to .NET Core 2 once I’ve finished the upgrade.
Pinch.Api
This is an ASP.NET Core MVC project. It contains all of my API endpoints and is protected using IdentityServer4.AccessTokenValidation.
The startup class uses the following:
app.UseIdentityServerAuthentication(new IdentityServerAuthenticationOptions() {
    Authority = settings.BaseUrls.Auth,
    RequireHttpsMetadata = true,

    EnableCaching = false,

    ApiName = "api1",
    ApiSecret = Configuration["AppSettings:Keys:Api1"]
});
An example API endpoint looks like this:
[Route("[controller]")]
[Authorize]
public class EventsController : BaseController
{
    private readonly EventService _eventService;

    public EventsController(EventService eventService)
    {
        _eventService = eventService;
    }

    [HttpGet()]
    public async Task<IActionResult> GetEvents(int page = 1, int pageSize = 50, DateTime? startDate = null, DateTime? endDate = null)
    {
        var events = await _eventService.GetEventsForMerchant(SubMerchantId, page, pageSize, startDate, endDate);

        return Ok(events);
    }
}
Pinch.Auth
This contains the actual implementation of Identity Server. I’m using IdentityServer4.EntityFramework and IdentityServer4.AspNetIdentity to take advantage of the ASP.NET Identity authentication system, stored in a SQL Server using Entity Framework. This really takes the hassle out of storing passwords, and is HIGHLY recommended compared to rolling your own user authentication solution. Though, relying solely on third party authentication such as Microsoft, Facebook or Google is even better!
The important startup code I use here is:
services.AddIdentityServer(options =>
{
    options.UserInteraction.LoginUrl = "/login";
    options.UserInteraction.LogoutUrl = "/logout";
})
    .AddSigningCredential(cert)
    .AddInMemoryApiResources(Pinch.Domain.Authentication.Resources.GetApis(
        Configuration["AppSettings:Keys:Api1"],
        Configuration["AppSettings:Keys:FilesApi"]))
    .AddInMemoryIdentityResources(Pinch.Domain.Authentication.Resources.GetIdentityResources())
    .AddOperationalStore(o => o
        .UseSqlServer(Configuration["Data:PinchContext:ConnectionString"], options =>
                options.MigrationsAssembly(typeof(DataModule).GetTypeInfo().Assembly.GetName().Name)))
    .AddAspNetIdentity<User>();

services.AddScoped<IProfileService, PinchProfileService>();
services.AddScoped<IClientStore, PinchClientStore>();
Though this isn’t super useful out of context, the important takeaways are:
-
I use in memory Api Resources and Identity Resources, since updating the database with this information was a pain and it’s static anyway.
-
I store the operational data in the database. (Current tokens/consent/etc…)
-
I override the Profile Service and the Client Store with my own implementations. This is how I manage third party clients, and how I customise the claims I assign to my users.
This project has direct access to the database since it needs to talk to the user store via ASP.NET Identity (which I keep in the same database as everything else).
Pinch.Data
This project contains my Entity Framework DbContext and all of the Entity Framework Migrations. I use one context for the entire application, including the ASP.NET Identity tables, the Identity Server tables and all application tables.
For more info, I’ve explained how to setup migrations for multiple contexts before.
Pinch.Domain
This project contains virtually all of the Entities, Models, DTOs, Enums and any other classes designed to just hold data. It’s at the top of the architecture tree because it’s the model of the entire application. This is one of the core tenets of Domain Driven Design, everything starts here.
When deciding to split your application into multiple pieces, this is what you’re splitting up first. Keep this in mind when designing how the classes in this project are connected.
Pinch.Services
This project contains pretty much all of the business logic for the application. This is really where monoliths get their bad rep, since this one assembly can grow quite large and it’s easy to tangle your logic together, making it difficult to split up later. If you’re going to add tests to your solution, it’ll be to test classes in here.
This is the only project that should be using the DbContext directly. Pretty much all API calls route directly to a service.
Pinch.Web
This is another ASP.NET Core MVC Application, but it contains only one route pointing at an Angular2+ application. It talks to Identity Server using Microsoft.AspNetCore.Authentication.OpenIdConnect. It fetches tokens from Identity Server, on the server side, and passes down the token to the Angular app using a ViewComponent. This way, the refresh token is never exposed to the client and anyone sniffing an access token will only have access until the token expires.
The important startup code here is:
var oidcOptions = new OpenIdConnectOptions()
{
    AuthenticationScheme = "oidc",
    SignInScheme = "Cookies",

    Authority = settings.BaseUrls.Auth,
    RequireHttpsMetadata = true,
    PostLogoutRedirectUri = settings.BaseUrls.Web,

    ClientId = settings.IdentityClient.ClientId,
    ClientSecret = settings.IdentityClient.ClientSecret,
    ResponseType = "code id_token",
    GetClaimsFromUserInfoEndpoint = true,
    SaveTokens = true,
};

oidcOptions.Scope.Clear();
oidcOptions.Scope.Add("openid");
oidcOptions.Scope.Add("profile");
oidcOptions.Scope.Add("api1");
oidcOptions.Scope.Add("offline_access");

app.UseOpenIdConnectAuthentication(oidcOptions);
The view component code that passes the token looks like this:
public async Task<IViewComponentResult> InvokeAsync()
{
    var token = await HttpContext.Authentication.GetTokenAsync("access_token");
    var id = await HttpContext.Authentication.GetTokenAsync("id_token");
    var refresh = await HttpContext.Authentication.GetTokenAsync("refresh_token");

    var settings = new AppSettingsViewComponentModel()
    {
        ApiUrl = _appSettings.BaseUrls.Api,
        AuthUrl = _appSettings.BaseUrls.Auth,
        WebUrl = _appSettings.BaseUrls.Web,
        AccessToken = token,
        UserFullName = HttpContext.User.FindFirstValue("name"),
        UserEmail = HttpContext.User.FindFirstValue("email"),
        MerchantName = HttpContext.User.FindFirstValue("merchant_name"),
        LiveEnabled = HttpContext.User.FindFirstValue("live_enabled") == "true",
    };

    return View(settings);
}
In Summary
There’s a fair bit of code presented without context, some settings that are set due to my migration from the early days of Identity Server 4, and some unique architecture decisions presented in this post. If you’re looking to understand how Identity Server works, I strongly recommend you check out the Identity Server Quickstart Samples. These are kept up to date, and are the best way of starting your solution. Once you have played around with the configuration and figured out how Identity Server best fits your needs, you can start to design a more robust architecture.
Hopefully this quick overview has given you some more insight into how to design an architecture. If you have any questions about what I’ve presented here, or about Identity Server in general, hit me up on twitter at @BenWhoLikesBeer.
If you haven’t already, you can check out my presentation of the above in my video: Identity Server 4 from Basics to Brain Melt - Ben Cull at NDC Oslo 2017.
Cheers!